Application Instructions

1. Open the Jar
Using pin, open three to five holes in sifter label. DO NOT remove sifter label. If you do remove the sifter label, the minerals will be quite messy.
Using pin, open three to five holes in sifter label. DO NOT remove sifter label. If you do remove the sifter label, the minerals will be quite messy.

2. Release the Minerals
Once the holes have been opened, replace the lid and turn the container upside down. Tap the container in the palm of your hand or on the bathroom counter three to five times. This will release minerals into the lid. With the container remaining lid side down, open jar and set both lid and the base of the jar down.


Once the holes have been opened, replace the lid and turn the container upside down. Tap the container in the palm of your hand or on the bathroom counter three to five times. This will release minerals into the lid. With the container remaining lid side down, open jar and set both lid and the base of the jar down.


3. Choose Your Brush
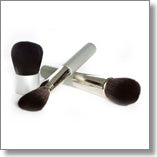
Choose your makeup brush for application. A large fluffy brush such as the Dome Brush or Kabuki Brush will give you a more natural application. The Deluxe Brush will give you more complete coverage.
Choose your makeup brush for application. A large fluffy brush such as the Dome Brush or Kabuki Brush will give you a more natural application. The Deluxe Brush will give you more complete coverage.

4. Press the Brush
Take your brush and dip it into the lid with the loose minerals. Look at your brush; there will be quite a bit of loose minerals on it. Take the brush and tap the extra minerals into the sifter on the shaker jar. Now look at your brush, there should be a nice “dusting” of loose minerals on the brush. You are now ready to apply.

Take your brush and dip it into the lid with the loose minerals. Look at your brush; there will be quite a bit of loose minerals on it. Take the brush and tap the extra minerals into the sifter on the shaker jar. Now look at your brush, there should be a nice “dusting” of loose minerals on the brush. You are now ready to apply.

5. Apply the Minerals
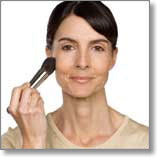
With the dusting of loose minerals on your brush, start at the top of your forehead and blend in downward motions on one side of the face. This amount of product will cover one-half of your face. Repeat STEP 4 and continue with downward strokes until entire face is covered with one layer of minerals.
With the dusting of loose minerals on your brush, start at the top of your forehead and blend in downward motions on one side of the face. This amount of product will cover one-half of your face. Repeat STEP 4 and continue with downward strokes until entire face is covered with one layer of minerals.

Natural Coverage - use the Dome Brush or the Kabuki Brush.
Repeat steps #4 and #5 two to three times.
Complete Coverage - Use the Deluxe Brush
Repeat Steps #4 and #5 four times.
Camouflage/Conceal - use the Foundation/Blending Brush
Press and pat foundation on specific areas to be concealed. Follow with two – three layers of foundation over entire face.
- Large pores – apply Face Primer to the areas to be minimized first, and then apply Loose Mineral Foundation.
- Dry skin – use Skin Spritz to hydrate the face after applying the Loose Mineral Foundation.
- Mature skin – use Face Primer under Loose Mineral Foundation to minimize fine lines and even out skin tone.
- Use Skin Spritz to set the makeup. Skin Spritz may also be used throughout the day to rehydrate the skin.
- For best results on darker skin tones, do not apply more than three layers of Loose Mineral Foundation and always use a press and pat method of application. Do not apply using a circular motion or blend in a downward motion as this may cause the Loose Mineral Foundation to turn “ashy.”
- To inquire about specific methods of application, consult your aesthetician or makeup artist.